How to Set Up Your Own VPN Server (and Ad-Blocker) with a Raspberry Pi
Objective:
Set up a Raspberry Pi as a VPN to your home network in order to increase security and privacy while browsing on public networks.
Personal objective: Learn a little bit more about networking, security, and do something with my newly gifted Raspberry Pi!
What:
This is a beginner’s tutorial for setting up OpenVPN on a Raspberry Pi, using PiVPN and a MacOSX.
Why:
Browsing on open WiFi, such as Starbucks, your hotel, or any other place, means that anyone with enough know-how can see the data you’re transmitting or perform a man-in-the-middle attack. Setting up a VPN server means that your data is now encrypted and can only be read through your home ISP provider. It also allows you to access your home network and files while you’re away from home, if you wish. You could purchase a monthly subscription service from a VPN provider, but you risk not knowing if you can really trust that provider, that they set up their VPN correctly/securely, and that they are not collecting information on you. Additionally, a Raspberry Pi set will only cost about $50 total - a one time cost rather than a monthly subscription - and will provide you with a great deal more protection and privacy.
What you need:
- Raspberry Pi
- 8GB or larger SD card
- Ethernet cable or wireless dongle
- (Optional, but highly recommended:) 1Password or some other reasonable password storage/generator for all the different passwords you’ll create in this tutorial
How:
Raspberry Pi Setup
The below is going to walk through how to set up a “headless” Raspberry Pi. That means we don’t need anything beyond what is mentioned above, i.e. no need for an extra keyboard/monitor, etc. Everything will be more or less done in the command line.
Step 1: Download the Raspbian image (Jessie Lite is sufficient) on your local drive.
Step 2: Connect the SD card to your computer. Unzip the file and burn the .img to your SD card using Etcher (easiest method), or follow instructions here for a manual install.
Step 3: Add a file called ssh to your SD card (with no extension) so that you can access the Pi via SSH. This is essentially equivalent to
$ touch ssh
Step 4: Now plug in the SD card into your Rasberry Pi, connect the ethernet to your router, and plug in the Pi to a power source.
Step 5: Open the Terminal. Find your Raspberry Pi’s IP address. You can do this by logging into your router and looking up attached devices, or via the following command in the Terminal.
$ arp -a
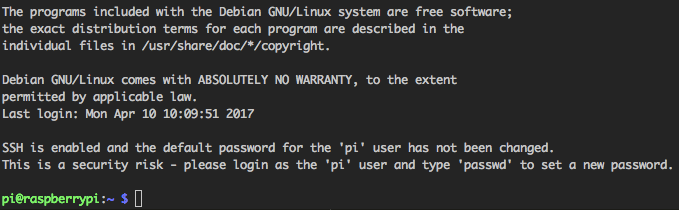
Step 6: SSH into your Pi. Out of the box, the default username and password are:
username: pi
password: raspberry
Replace the below IP address with the one you found in the previous step.
$ ssh pi@192.168.1.2
Follow the prompts through until you are connected and see a prompt like this:
Step 7: Configure your Pi and follow the GUI prompts using the arrow keys and spacebar. At MINIMUM, change the password if nothing else. (Recommended to change localization settings too.)
$ sudo raspi-config
More on configuration here.
Step 8: Update the Pi.
$ sudo apt-get update
Step 9 (optional): To see a GUI desktop for your Pi, enable VNC server following directions here.
Done with the Raspberry Pi setup!
PiVPN Setup
Step 1: Install PiVPN onto the Raspberry Pi. (Always caution when using commands to pipe to bash. The below was taken from the PiVPN site, feel free to have a look at the source code.)
$ curl -L https://install.pivpn.io | bash
Step 2: Walk through the prompts, choosing to automatically do security updates, the UDP protocol, the default port number (or something else if you wish), and at least 2048 encryption. The 2048 encryption bit will take a long time (up to 30 mins or more depending on your machine) so feel free to walk away and do something else in the meantime.
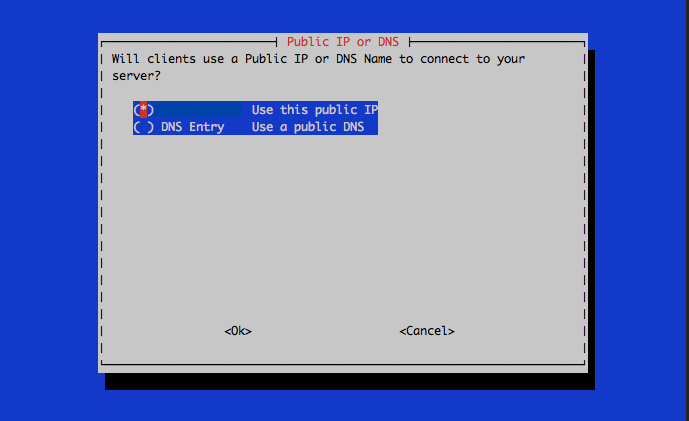
Step 3: When you get to to this screen, choose the IP if you have a static IP address you can use from your ISP. If not, sign up for No-IP and select the public DNS using the spacebar key. Enter the public hostname you created with No-IP.
Step 4: Your initial setup is complete, and it will ask to reboot. Reboot it now.
Step 5: Forward your Pi’s VPN port on your router by adding port forwarding in your router’s configuration settings.
Step 6: Create a client key. (One per device, so if a device ever gets stolen you can revoke access easily and still continue to use your VPN.) You can name the client whatever you’d like, but be sure the password is strong. This will create a .opvn file that you will need to transfer to the computer(s) that need VPN access.
Step 7: Transfer the .opvn file from the /home/pi/ovpns directory of your Pi to your local computer(s). You can do this with Filezilla to transfer via SFTP. If you’re transferring to an iOS device (iPhone, iPad), download OpenVPN Connect from the iTunes Store. Then connect your device to iTunes, go to Apps in your device, scroll to the bottom to select OpenVPN, and drop your .opvn file into the OpenVPN Documents.
Step 8: Download and install Tunnelblick VPN Client for MacOSX. For iOS, open the OpenVPN app, and you should see the name of your VPN host there. Click the add button to add the configuration.
Step 9: Double-click the .opvn file, which will open Tunnelblick to install the VPN configuration. For all devices: connect to the VPN tunnel using the password you created earlier. Give it a minute or so, then running this command on your Pi should show the device(s) connected:
$ pivpn clients
Done with VPN setup!
Okay, wait… for reals though, how do I know my VPN is working besides the fact that it says it’s connected?
There may be a better way, but the fastest way I can think of is to connect to another network and try to VPN into your home network. If you have access to tether to your phone you can connect your device to your phone’s hotspot, go to whatsmyip.org and check your IP address. Then, VPN into your home network and check your IP again. This should change and match your home network’s IP. Voila!
Note that using a VPN means that you’re connecting to your home network so when you’re browsing on other networks no one will be able to tamper with or see what you’re doing. Your ISP will still be able to see everything you’re doing, and this does not give you anonymity on the internet. If you’re looking for more secure browsing in general I highly recommend using the HTTPS Everywhere browser extension, and if you’re looking for browsing anonymously try Tor.
Bonus Section!
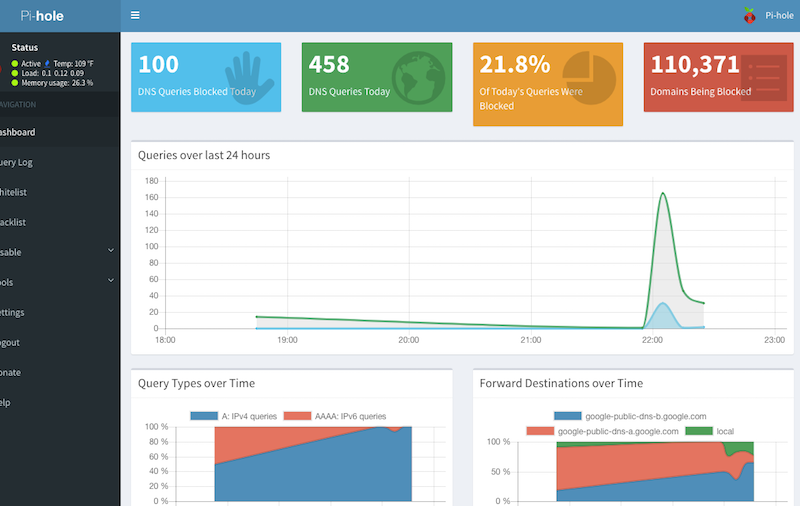
Upgrade your Raspberry Pi to also block ads with Pi-hole. This mini-tutorial below demonstrates how to block ads for any device connected to the router.
Step 1: Follow through the prompts and default settings until you reach the networking interface. Choose tun0 using the spacebar key.
Step 2: Change your password using the prompt:
$ pihole -a -p
Step 3: Configure your router settings by setting the primary/static Domain Name Server Address as Raspberry Pi’s IP.
Note: tun0 refers to the VPN and eth0 refers to your LAN devices. If you have LAN connected devices, you will need to follow the next steps in order for the Internet to work.
Step 4: On your Pi, run the following commands to edit the pihole config file in VIM. (Crash course on VIM here.)
$ sudo vi /etc/dnsmasq.conf
Look for a line that begins with #interface= and add eth0 (ethernet connected devices), tun0 (VPN tunnel), and wlan0 (wireless devices) as interfaces (as needed) like so:

Step 5: Restart the Raspberry Pi:
$ sudo shutdown -r now
Now wait a few minutes for it to reboot, and you’re all done! Now sit back, relax, and watch those ads get blocked as you sip that fine whisk(e)y in your hand.
Ad-free surfing, woohoo!
Hey! Did you like my tutorial? If so, consider supporting me by donating to my next Raspberry Pi project, purchasing materials for this project through one of my Amazon Associate links above, or even buying me a Raspberry Pi if you’re feeling very generous. In any case, thanks for reading and let me know if I can help you set up secure and private browsing!